Image Annotations
Image Annotation is an application that allow you to collect and annotate images in a collaborative way. These interactive activities can be achieved individually or in groups, on any types of JPEG images. It is possible to create a portfolio and to use them for presentations or illustrations. Several activities types are possible. For more information, look at the activities section below
Fermé 
Examen 
Limité 
Libre 
Référence 
Personnel 
Image explorer
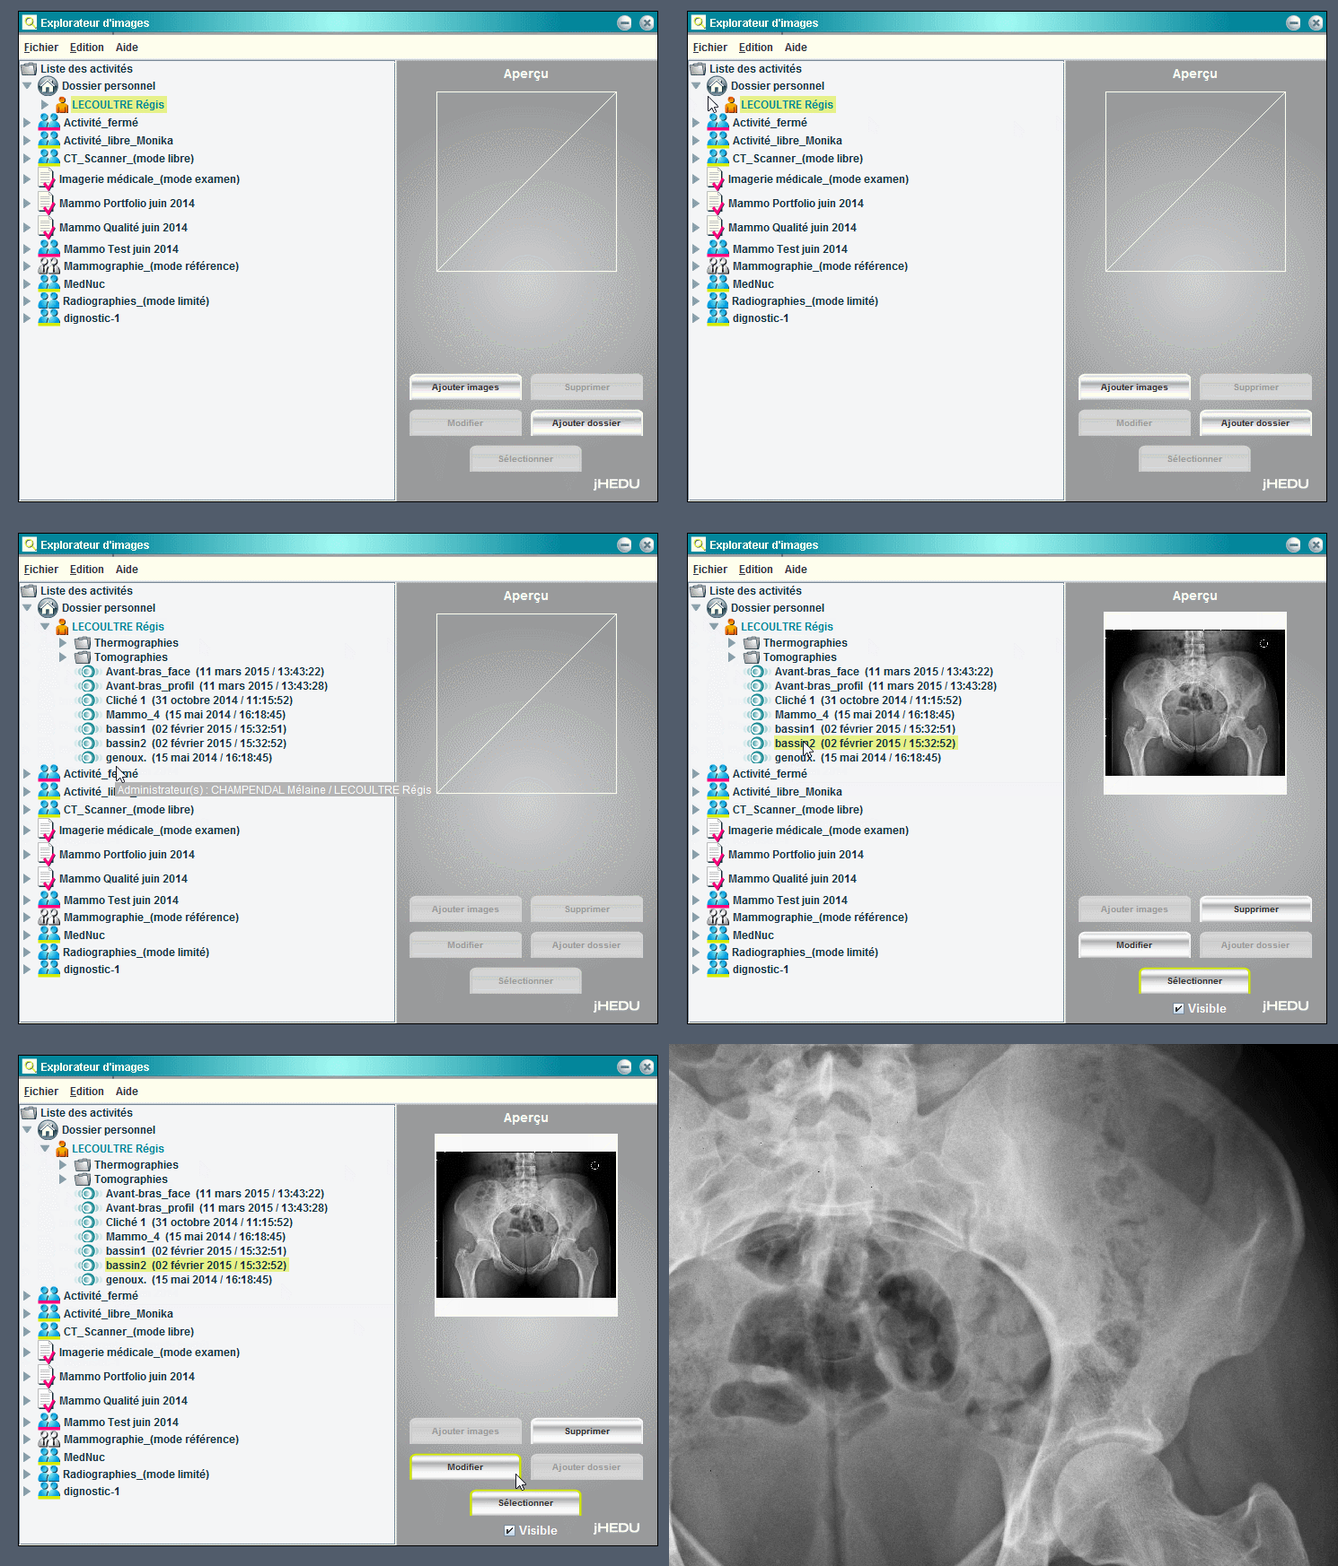
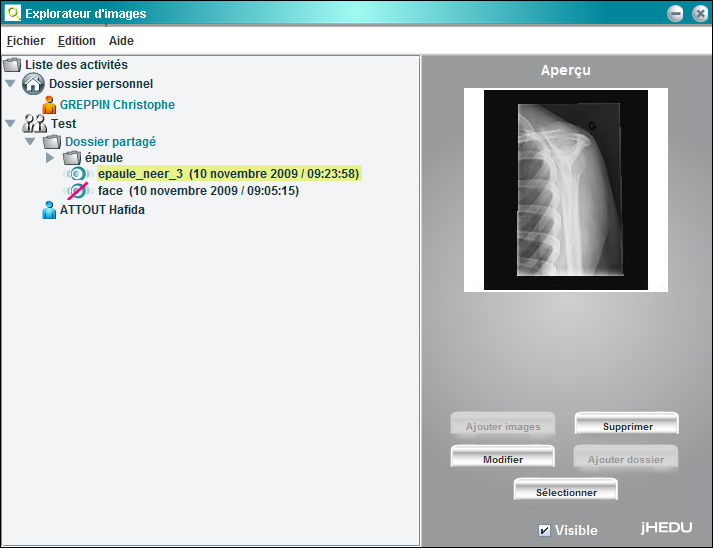
When ImageAnnotation is open, the user has access to the file explorer, where he can see all the activities he is registered in. In every activities, you will find the different visible images from every user, based on a hierarchical system.
The user can indeed upload images but can render them «invisible» to the other users. Only the owner of the image can do this change of state. The same change of state can be done to the annotations.
Every activity includes a shared folder that allows the professors in charge of the activity to make available images.
How to add an image?
How to create a folder?
How to delete a folder or an image?
How to rename a folder or an image?
How to move a folder or an image?
How to select an image to annotate it?
How to add an image?
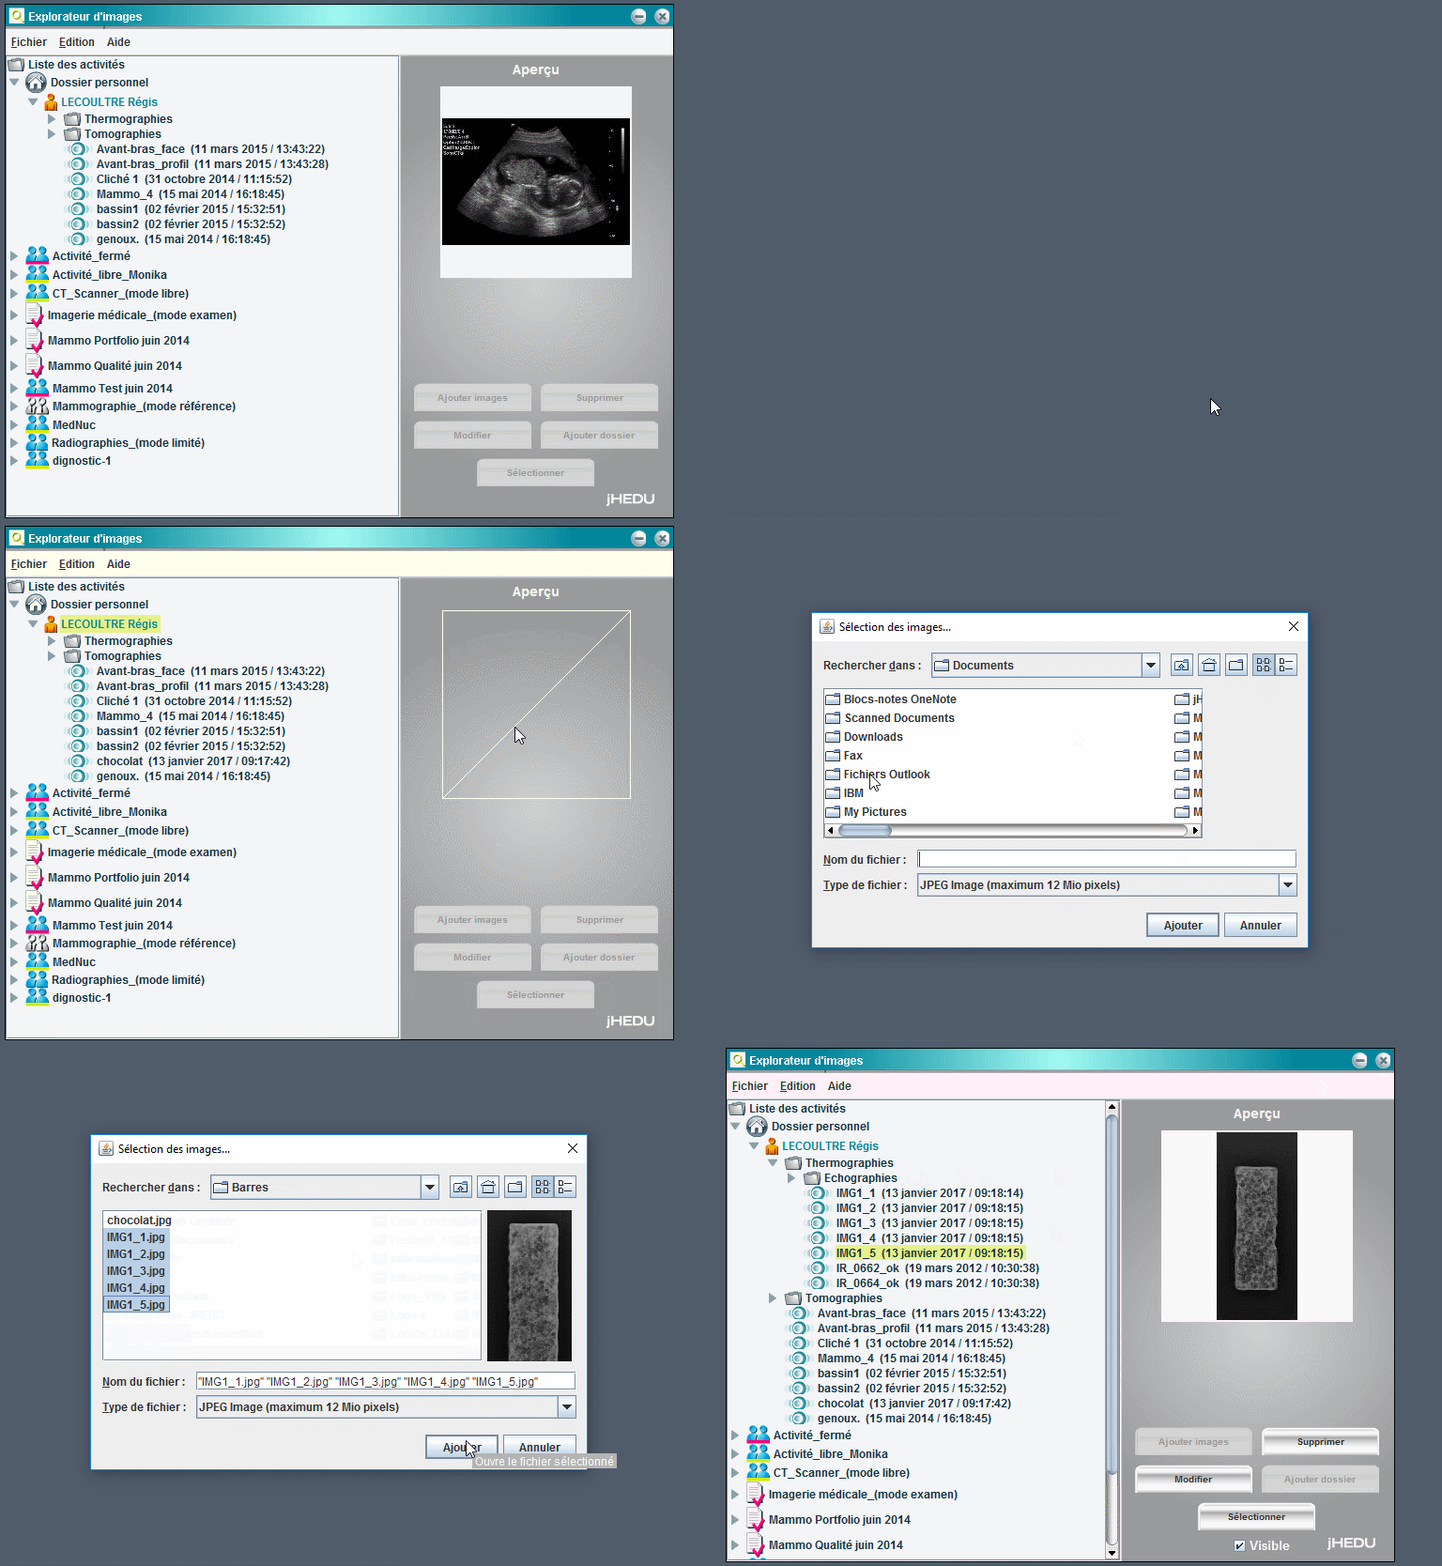
The images can be added by using the « Ajouter Images » button. A new window opens to navigate the computer hard drive. This explorer only allows you to see directories and JPEG images. When an image is selected, a thumbnail is displayed, thus making the selection of the right images easier. It is also possible to select multiple images. When the images are selected you simply need to click on the « Ajouter » to upload them to the file server. A progress bar appears, allowing to monitor the file transfert. The uploaded images possessed by default the same name as the original images. These informations can be edited later.
How te create a new folder?
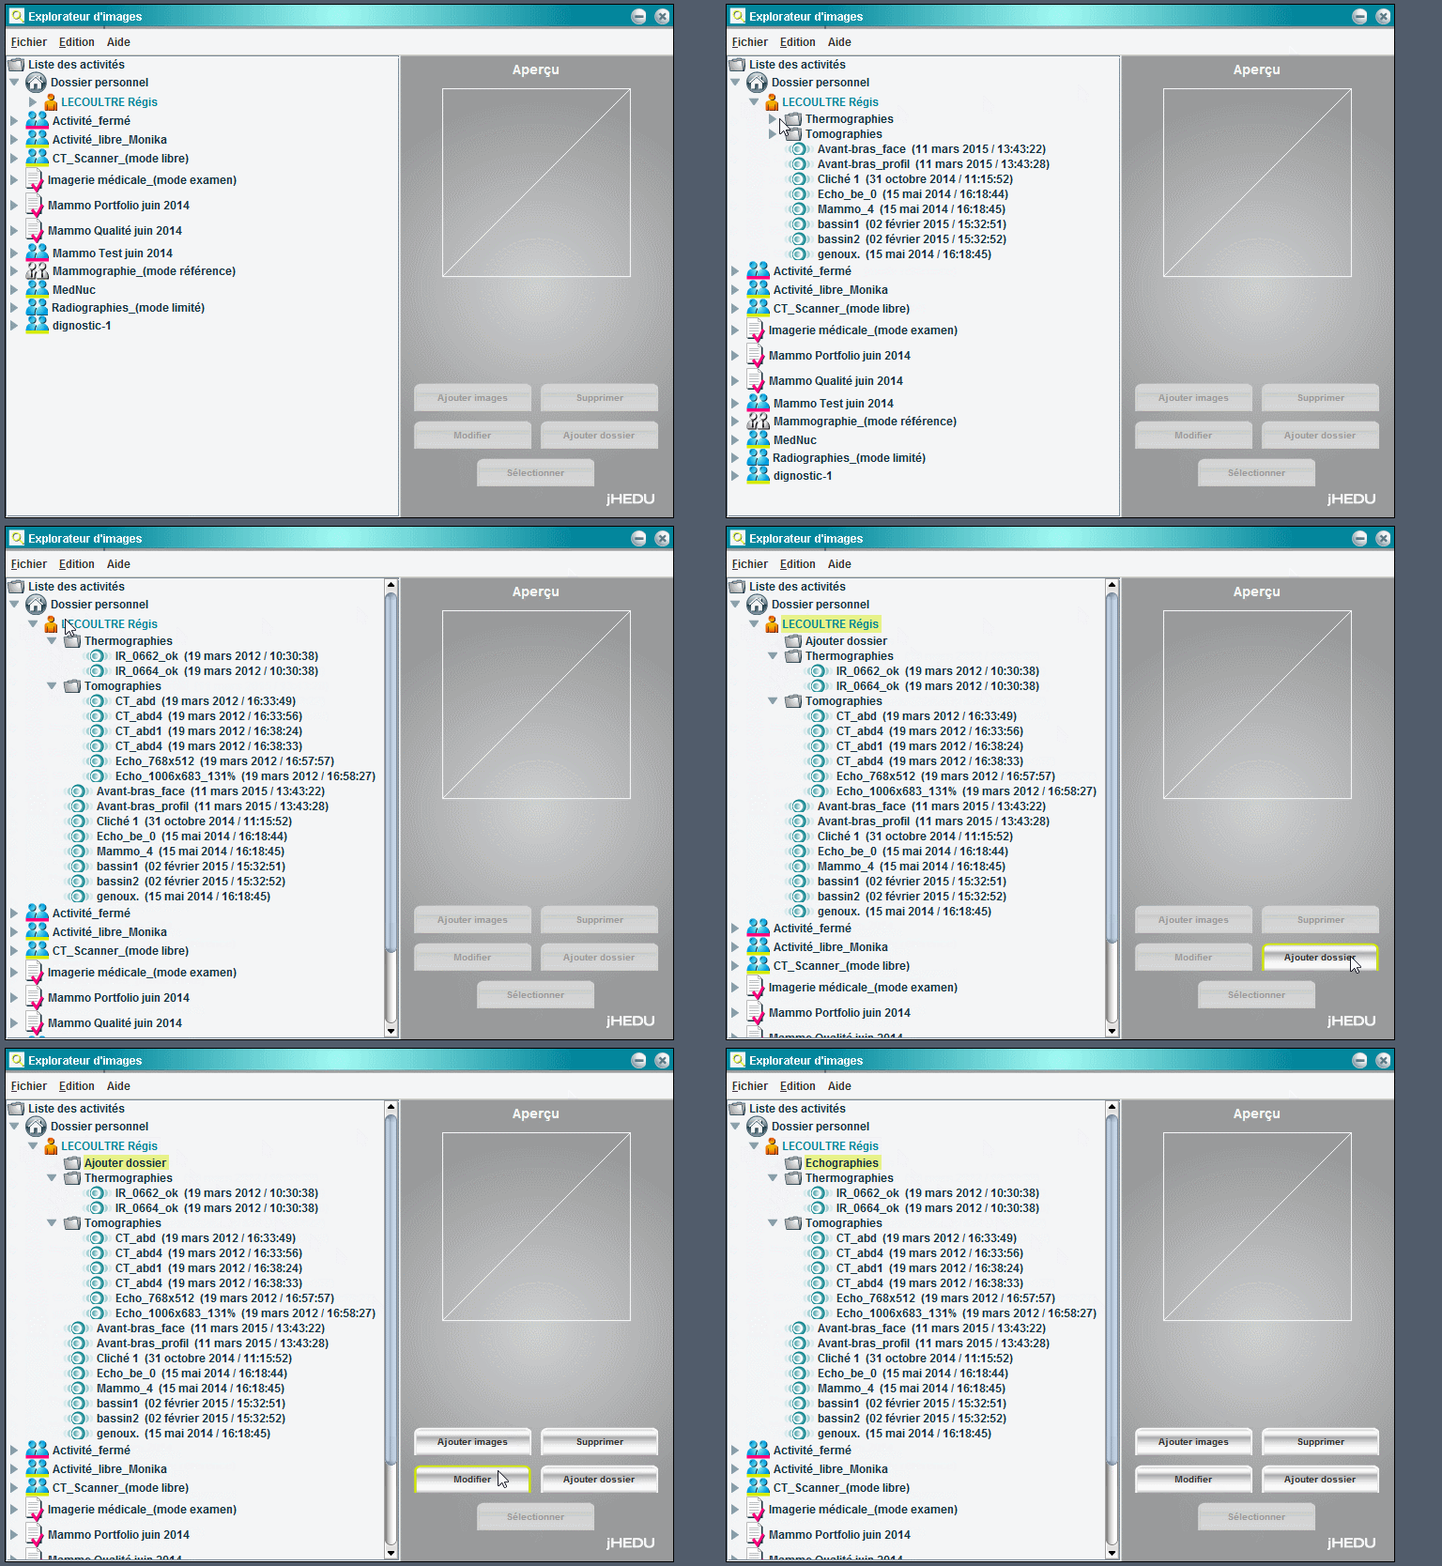
To improve reading and classification of the images the user can create new folders based on a hierarchical system by clicking on the « Ajouter dossier » button. This button is only active if a folder is previously selected. The user is only allowed to create new folders in his own folders, except for the professor that can create new folders in his students’ ones. The « Ajouter dossier » button creates a new folder named « Ajouter dossier ». By clicking one time on the name of the file, you can edit its name. When the name is changed, click enter to validate the name. If a folder does not contain images, it will not be saved when the explorer is closed. It is not possible to create two folders with the same name in a given folder.
How to delete a folder or an image?
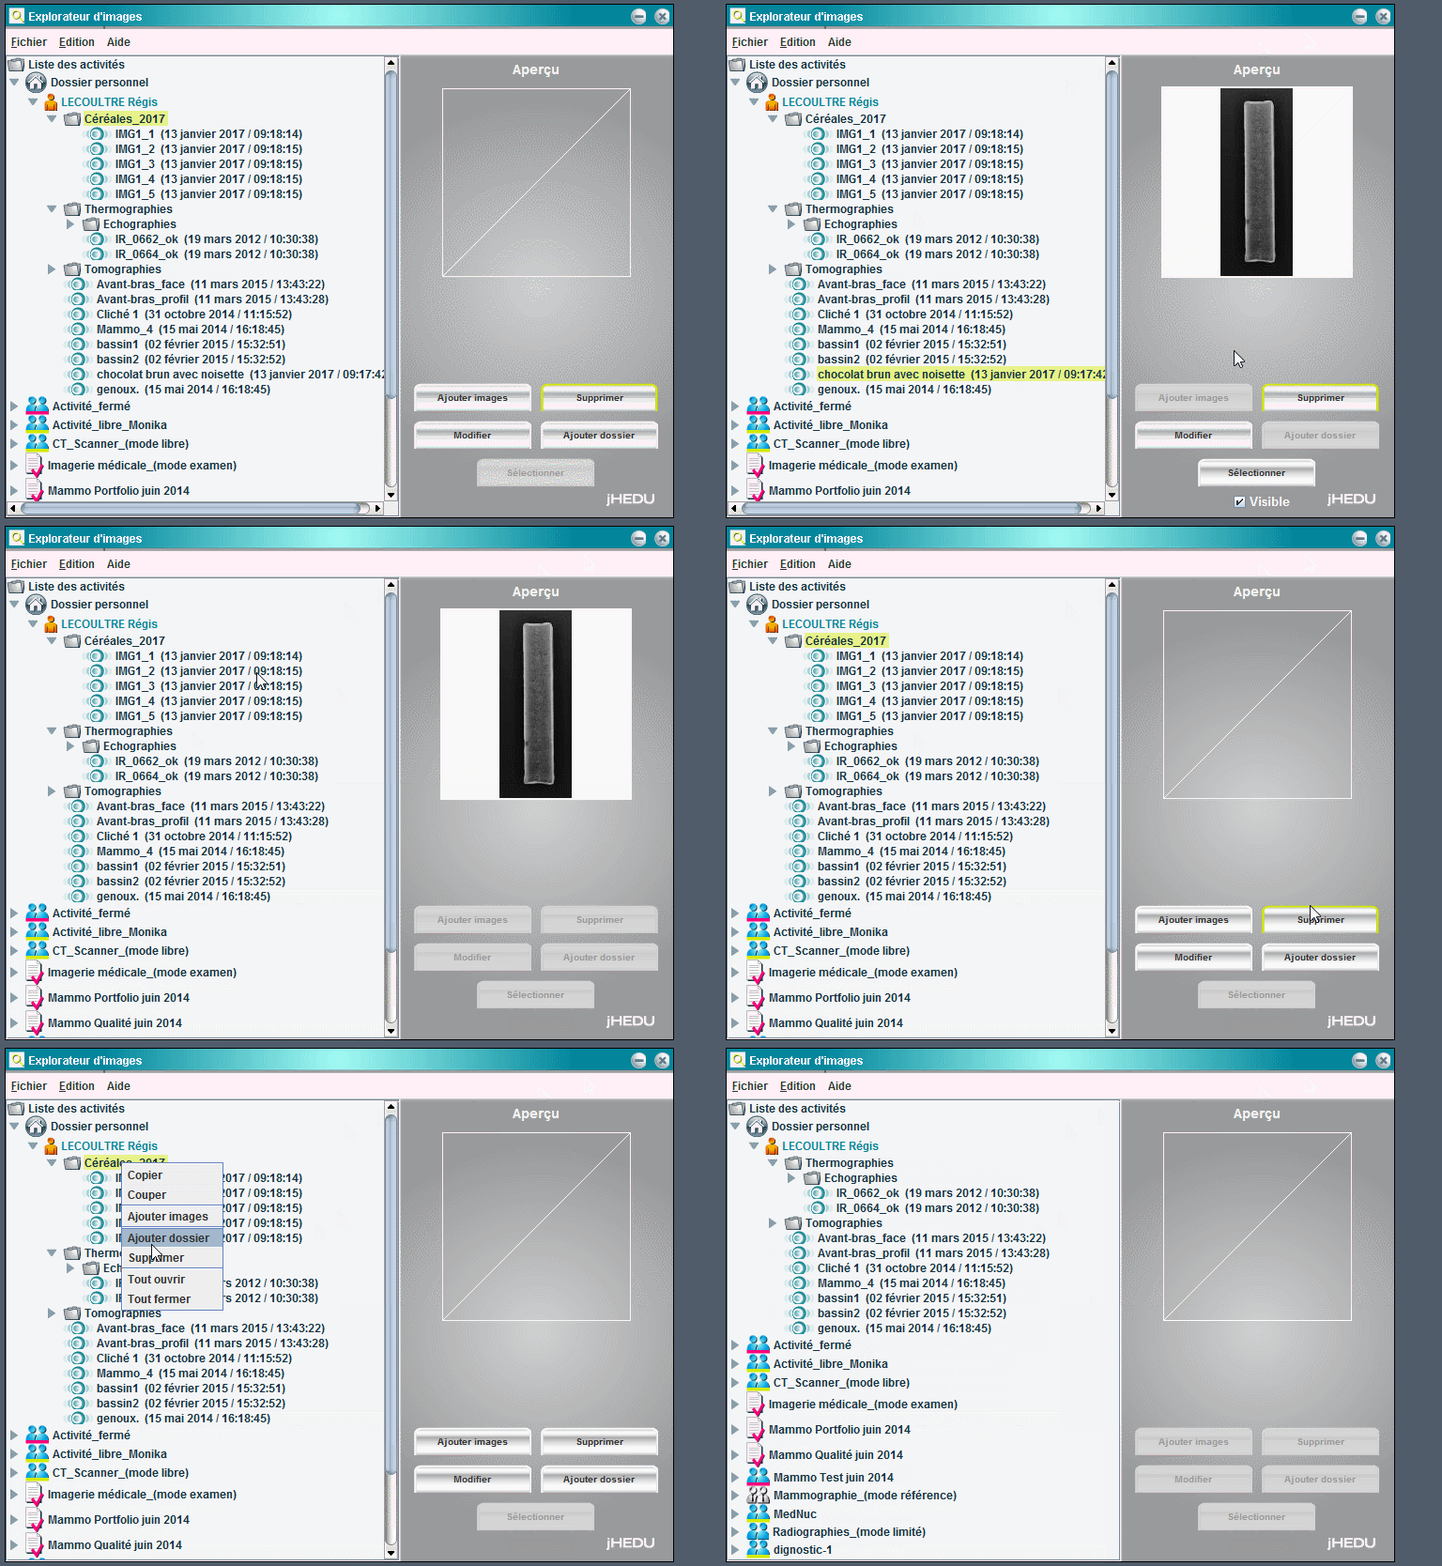
It is possible to delete any folder or image that the user created. As before, a teacher can delete its students’ folders or images. To delete a folder or an image, click on the « Supprimer » button. When deleting a file, a confirmation message pops up to confirm the suppression. If an image is deleted, its annotations are deleted too.
How to rename a folder or an image?
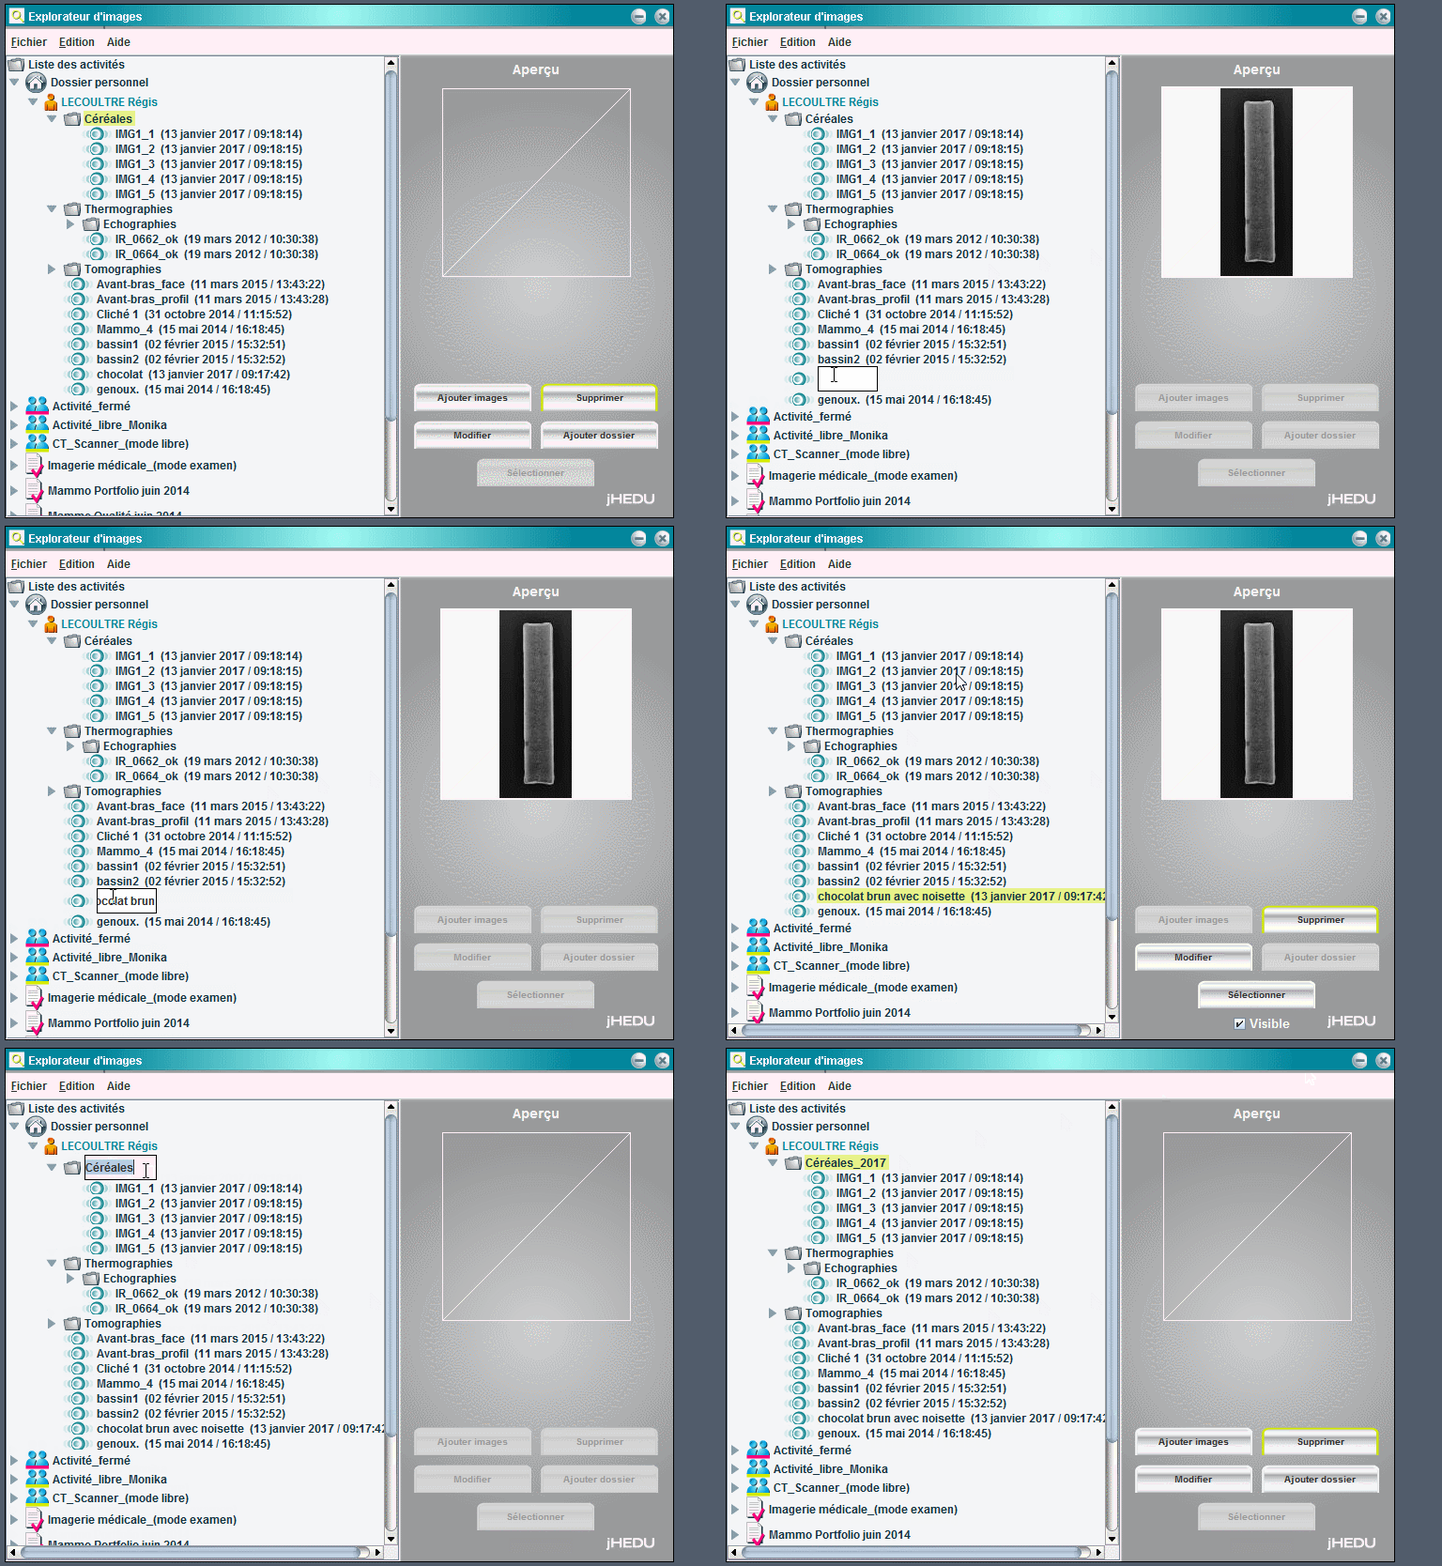
This action is also reserved for the user that uploaded the image or the teacher of the activity. To rename a folder or an image, click on the « Modifier » button. A valid element should be selected for the button to activate. After the button is pressed, you can rename the element and press « Enter » to confirm. It is not possible to have two elements with the same name within a directory. You can also choose if you want the element to be visible or not by ticking the « Visible » box, but this manipulation is only allowed for the image owner.
How to move a folder or an image?
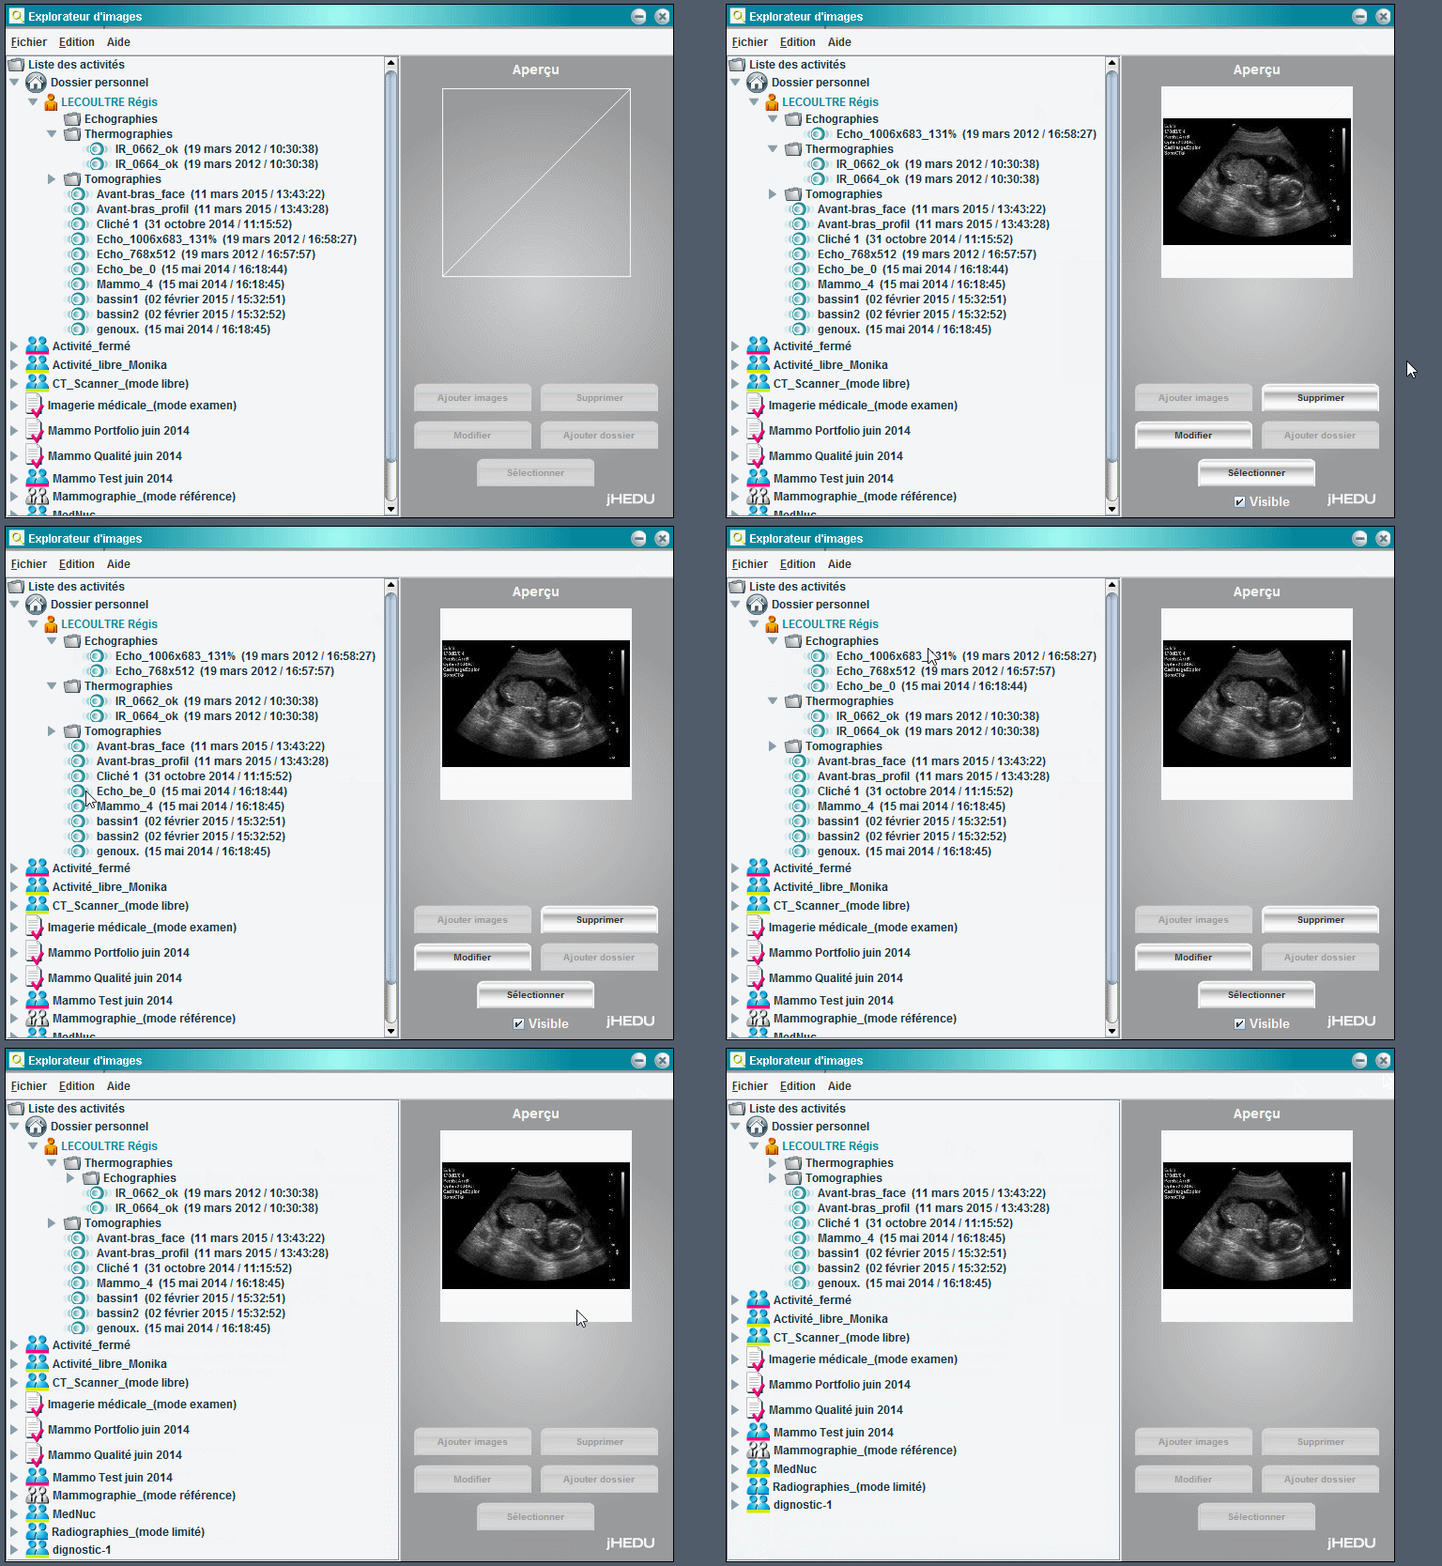
Like any file explorer, it is possible to use the drag and drop function. Like the other manipulation, the teacher can do this in any of his students’ directory and a student only in his own. It is possible to move an image alone or an entire directory. It is however not possible to move an image belonging to a user to another user’s directory.
Display settings.
Layers (annotations) already present.
Create new annotations.
Toolbar
Other utilizations
Les paramètres d’affichage.

By default, the image selected is opened at a zoom level to match your screen size and allowing you to see the entire image. The zoom level can be changed, as we will see later. If the zoom level is too high and only part of the image is displayed, you can use the scroll bars to navigate vertically and horizontally.
Even though the contrast and brightness are fixed parameters in a JPEG image, it is possible to change them temporarily to ease the annotation process. To change the brightness, hold the [B] key and the left click. The brightness can be adapted by moving your cursor horizontally. The same manipulation can be used to change the contrast by holding the [C] key this time. These modifications are lost when the image is closed.
The drop-down menu shown above offers the possibility to change the zoom level of the image and its annotations. You can adjust the zoom level from 10% to 100% by 10% incrementations and from 100% to 500% by 50% incrementations. It is of course possible to annotate an image at any zoom level, but the annotations will be saved in real size and will automatically adapt with the zoom level.
.

The drop-down menu shown above offers the possibility to change the zoom level of the image and its annotations. You can adjust the zoom level from 10% to 100% by 10% incrementations and from 100% to 500% by 50% incrementations. It is of course possible to annotate an image at any zoom level, but the annotations will be saved in real size and will automatically adapt with the zoom level.
Layers (annotations) already present
On the right side of the application is displayed a list containing the annotations already present on the image and visible to the user. The user rights about the visibility of other user’s/teacher’s annotations change according to the activity type.
When a layer is created, you can see the last and first name of the author as well as the date and time of creation. Layer colors can tell you if the layer is shown ( green) or not (purple). To show or hide a layer, just double-click on it. The layers or shown in chronological order (oldest first).
It is also possible to show or hide all the layers by double-clicking on the « LISTE ANNOTATIONS » title.

You can also delete layers from this right panel. To do this, right-click on the layer you want to delete and select « Supprimer ». A pop-up will open asking you to confirm your choice. If the « Supprimer » option is not shown by right-clicking on the layer, this mean that the user does not have the right to delete this layer.
Another manipulation accessible only by the authors is to make visible or invisible a layer. This option is available by right clinking on the layer. A little icon is visible in front of every layer. If this icon is crossed, the layer is invisible. This option is useful to teachers who want to make answers available only at the end of an activity.
New annotation
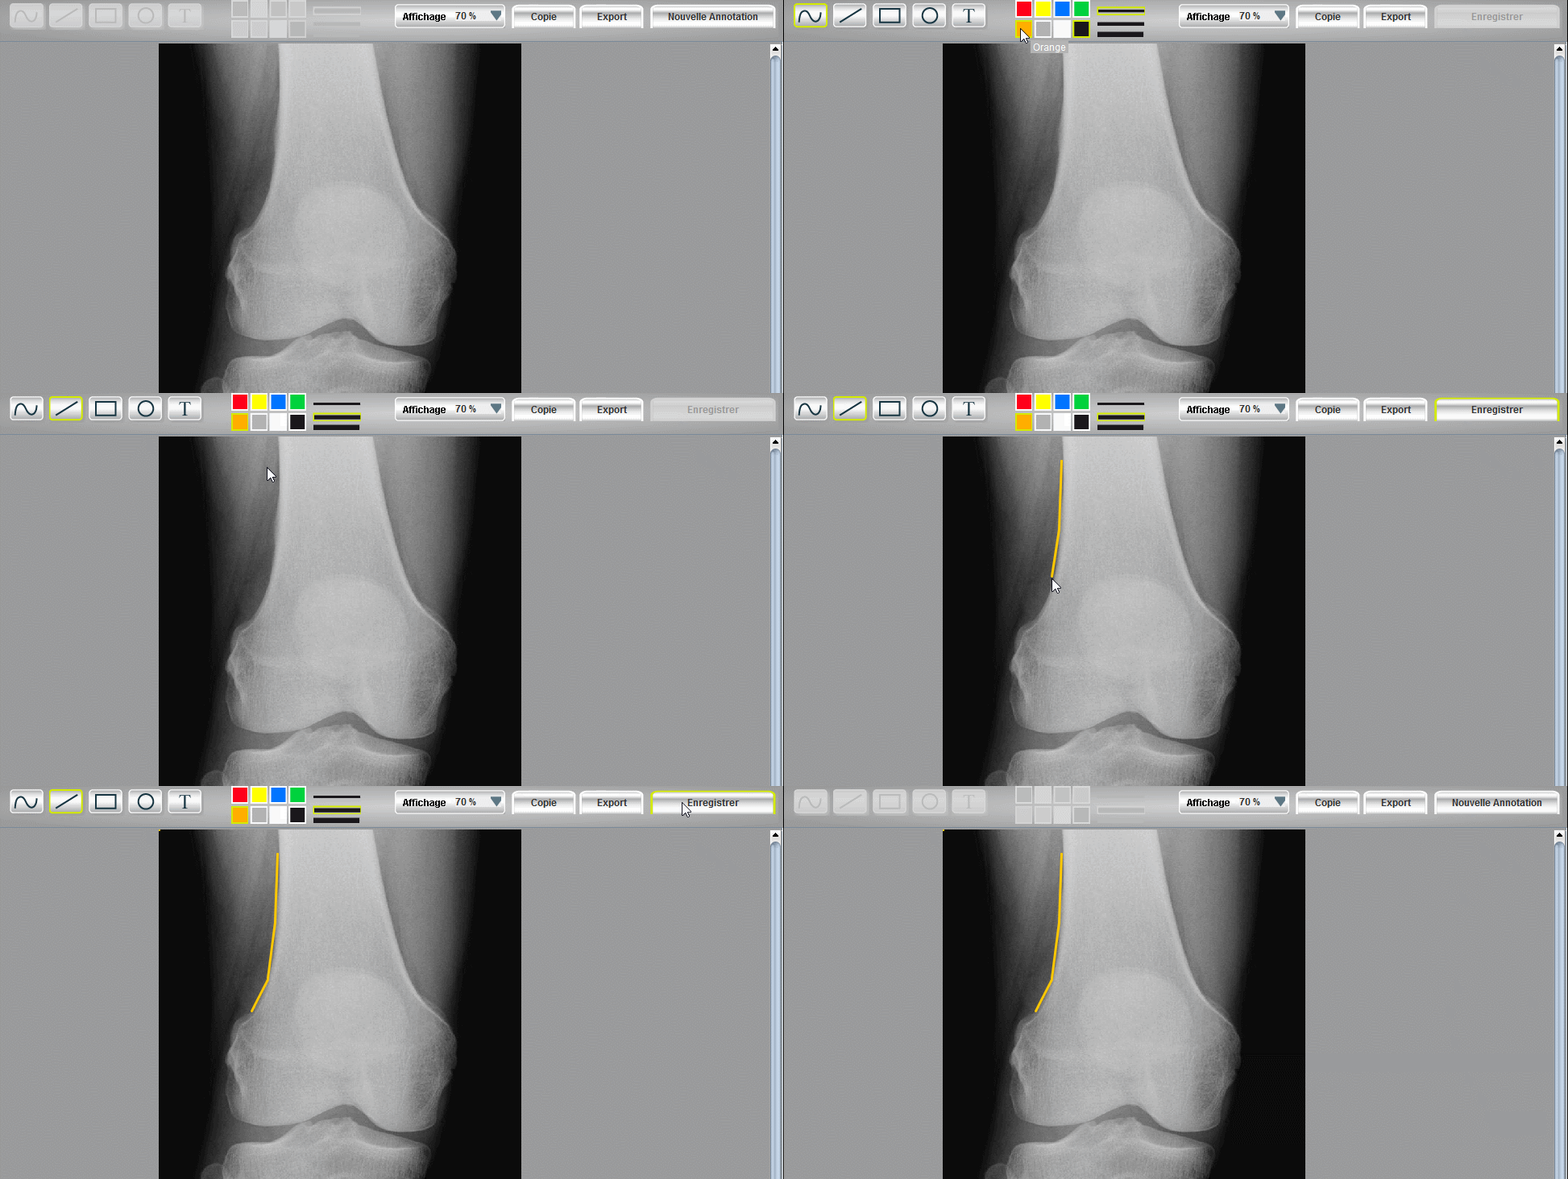
The button on the far right is the start button to create new annotations. Its label change depending of the action. When the Image Annotation application starts, all the buttons are disabled except for this one. You have to click on it to start a new annotation and activate the other tools.

When the annotation starts, its label changes to become as shown under:

When you click on this button, the layer is saved in SVG format on the server and is written as a new layer for the selected image in the database. The new layer is then visible in the right panel and can be displayed on the image. If the saving process fails, an error pop-up is shown to the user. The user can try to save it again later on.
You can also create a collaborative annotation. What this means is that you can create an annotation that depend on a preexisting annotation. It allows you for example to answer or correct an annotation by creating a new annotation. The new annotation is shown under the first one following a hierarchical order (as shown above). This option is available by right-clicking on the layer you want to answer to, the option being called « Répondre ».

Toolbar
The toolbar is located on the upper panel. The first button set allows the user to choose the color of the annotations. You can change the color at any given time to allow different colors in a same layer.

The second set allows you to choose the size of the drawing. Like the color selection, the user can change the size at any given time between the four sizes available for every line.

The set shown under gives you access to the different geometric shape available for drawing. Drawing is done by maintaining the left-click pressed and moving your mouse to shape your drawing as wanted. The shape is saved when the left click is released.

From left to right, the first button allows you to do free hand drawing. The second one allows you to draw a straight line. The next button is used to draw a rectangle or a square. To draw a square, you have to maintain the right click pressed as well as the left click. The fourth button works the same way this time for a ellipse or a circle.
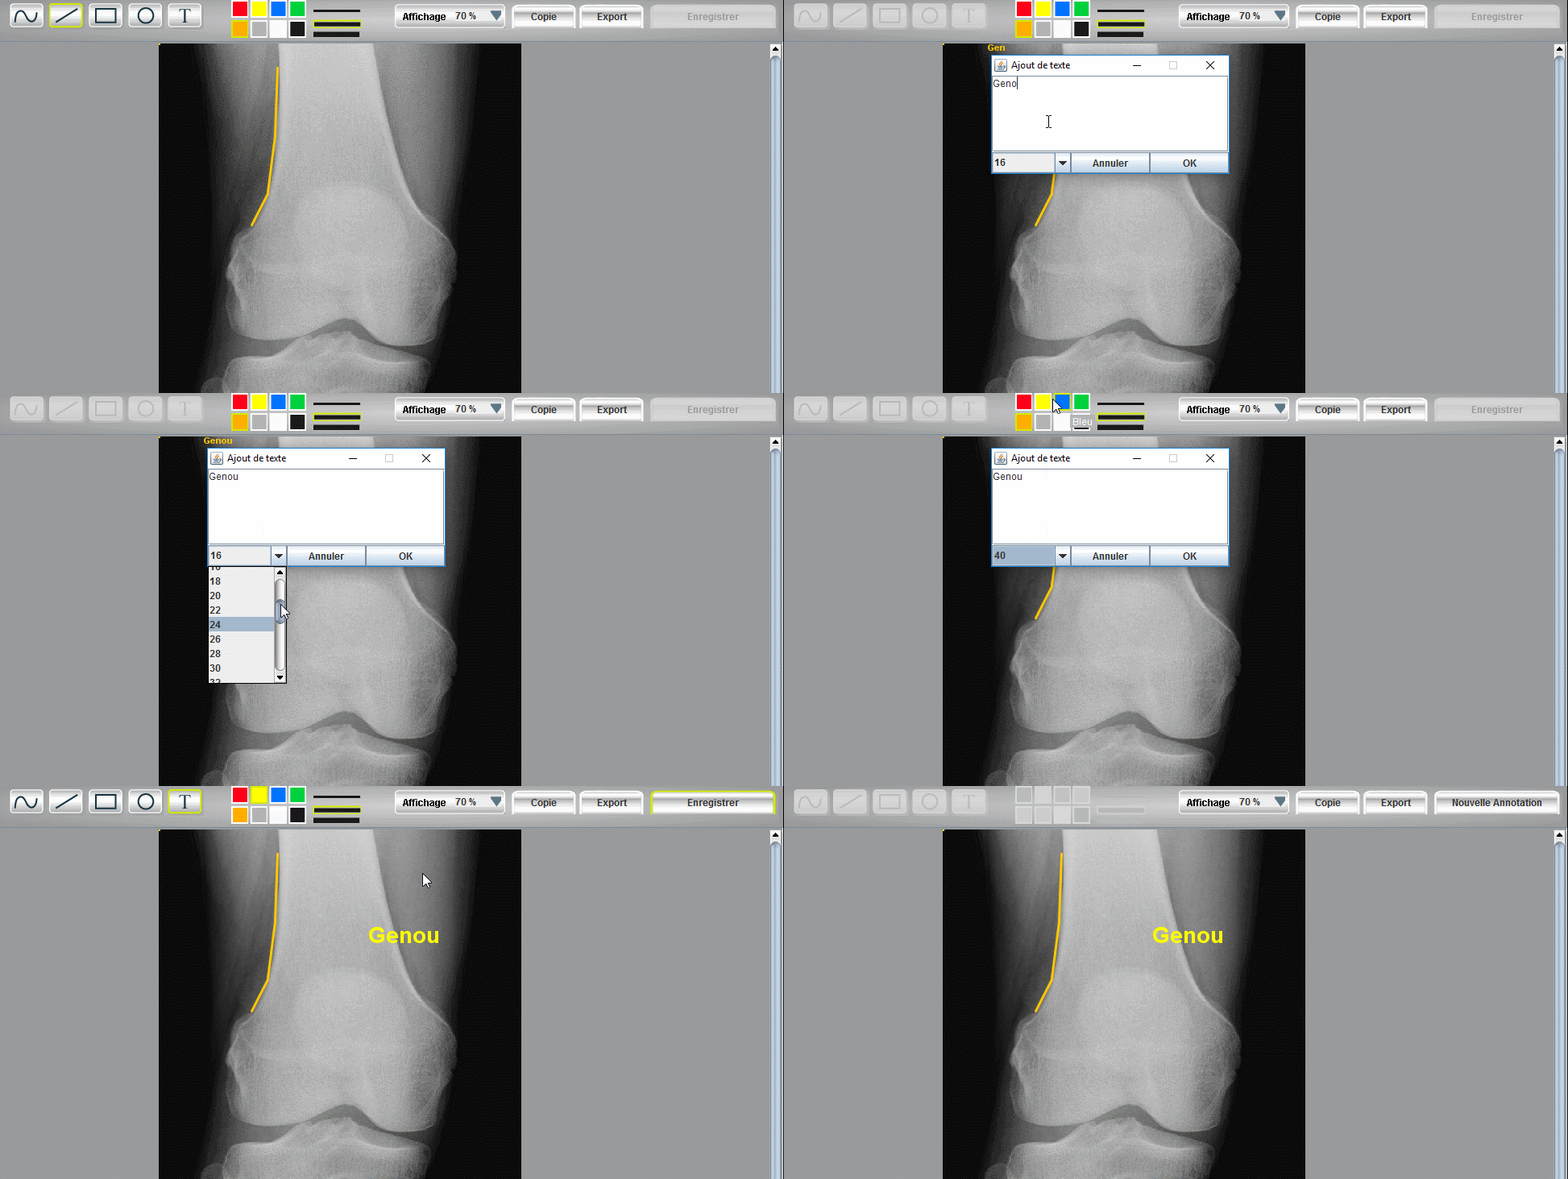
The last button allows you to write some text. A new window opens allowing you to write something and change the police size. When you are done writing, you can place the text on the image by left-clicking.
On the far left of the panel are located the manipulation buttons. They allow the user to interact with the annotations. You can delete any drawing one by one (left arrow) or restore a drawing deleted by mistake (right arrow). If the user draws anything new after deleting something, every drawings deleted before this action will be definitively lost.
The last button of this section (the X) delete the whole drawing. After user this button, it is impossible to restore the drawing. This button only allows you to delete the current annotation.
All the buttons of the toolbar will activate only if the function is available.

Other utilizations
The two buttons shown under can be used to « save » what is displayed to use it somewhere else.

This backup is composed of the image and every layers displayed at the time of the backup, whether they are saved or not. It is thus possible to print it, use it in an external document (Word, PowerPoint, …). The left button allows you to copy a region to the clipboard, shown by a transparent red rectangle. It is then possible to paste the selection anywhere. The left button allows you to export the whole image and layers displayed to a JPEF format file. You can choose the name and the location of the saved file in the dialog box that will open. You can also use CTRL+C to copy the whole image and layers displayed into the clipboard.
Note: for these three actions, the zoom level is respected.
